


In this article, we will guide you on how to back up Mac to Time Machine and restore Mac from Back up.
Backing up your Mac is an essential step in making sure you don’t lose your data in an event of software and hardware failure.
Thankfully macOS offers the Time Machine feature, which makes it easy and convenient for Mac users to create a back up of their Mac data and restore it at a later time.
Below you will find instructions on creating Time Machine Mac back ups and how to restore those back ups with the help of Migration Assistant.
Back up your Mac with Time Machine
If you are wondering what does Time Machine Back Up do, let’s clear up your confusion first.
Well, Time Machine Back Up is the built-in backup feature of your Mac that automatically backs up your data, including apps, music, photos, email, and documents.
When you have a backup, you will be able to retrieve files you later delete or are unable to access.
Create a Local Mac Back Up
You can follow these steps to create a local Mac back up.
Step 1. Connect an external storage device, such as a USB or Thunderbolt drive to your Mac to begin.
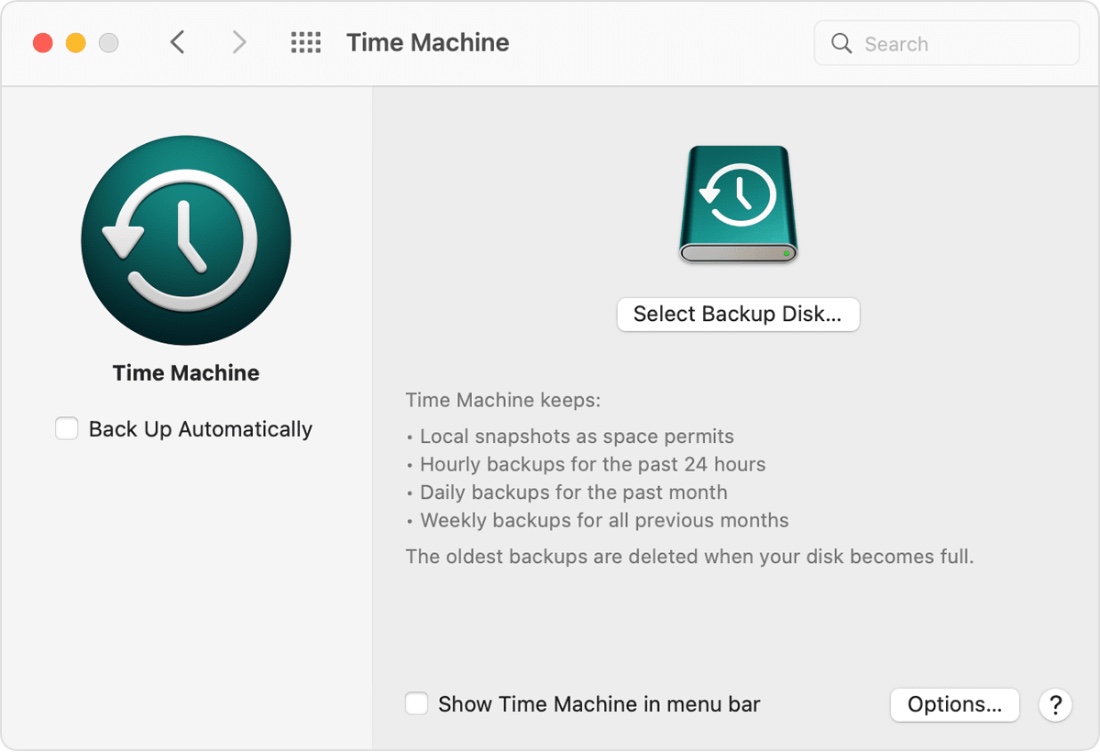
Step 2. Click on Apple logo from the top menu bar > System Preferences, then click Time Machine.
Step 3. Now click on the Select Backup Disk option.

Step 4. Click on the disk’s name that you want to use and then click on Use Disk option. In the meantime, Time Machine will start making periodic backups automatically without your intervention.
You can also kick off a backup manually, without waiting for the next automatic backup. This can be done by clicking on ‘Back Up Now’ option from the Time Machine menu in the menu bar.
Information about backup status or option to skip a backup in progress can also be found in the Time Machine’s menu bar icon.
For instance, during a backup, the menu shows how much has been completed. And when a Mac backup data is not underway, the menu shows the date and time of the latest backup.
Keep in Mind:
- Every hour, Time Machine makes a backup of the past 24 hours, every day for the past month, and every week for all previous months. As soon as your backup disk fills up, the oldest backups are deleted. It may take a while for the first backup to complete. You can keep using your Mac without any interruptions during that time.
- You have the ability to remove items from your Back Ups. This can be done by going to System Preferences -> Time Machine and then clicking on Options. There click on the ‘+‘ button to add times that you wish to be excluded from your backups. You can remove items from the exclude list by clicking on ‘–‘ button.
Restore Mac From Back up
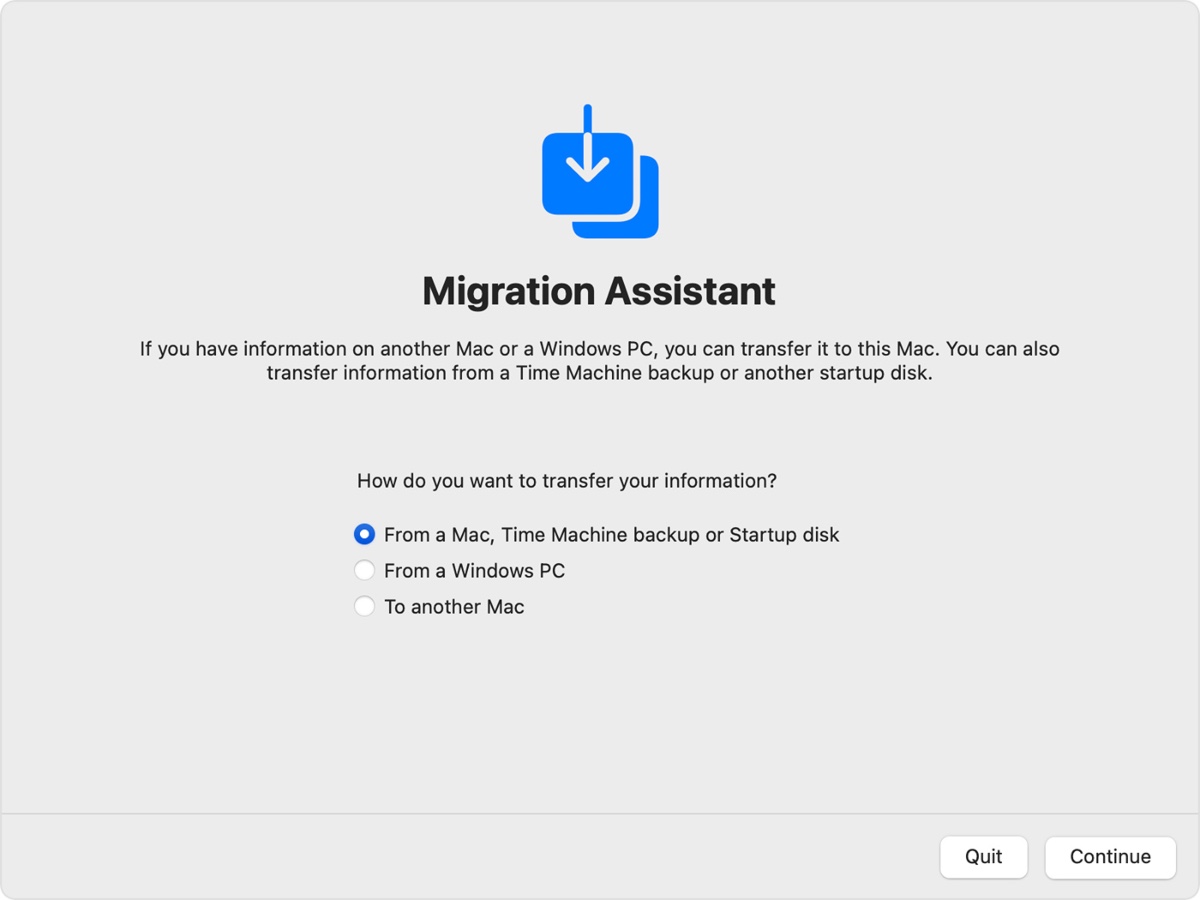
When transferring files from Time Machine backups to your Mac, it is best to use Migration Assistant.
If you are done with a Time Machine backup of your Mac, Migration Assistant can use that backup to restore your personal files, including apps and everything in your user account.
How to Use Migration Assistant
Step 1. In case you need to reinstall macOS, do that before starting. Reinstall macOS if you see a flashing question mark on your Mac.
Step 2. Connect your Time Machine backup disk to your Mac and and make sure it is turned on.
Step 3. Go to Migration Assistant on your Mac. You can find it in the Utilities folder of your Applications folder.
Note: If your Mac starts up with a setup assistant, asking for details like your country and network, move to the next step, because the setup assistant includes a migration assistant.
Step 4. Choose either the Mac, Time Machine backup, or startup disk as the method for transferring data. Click Continue.
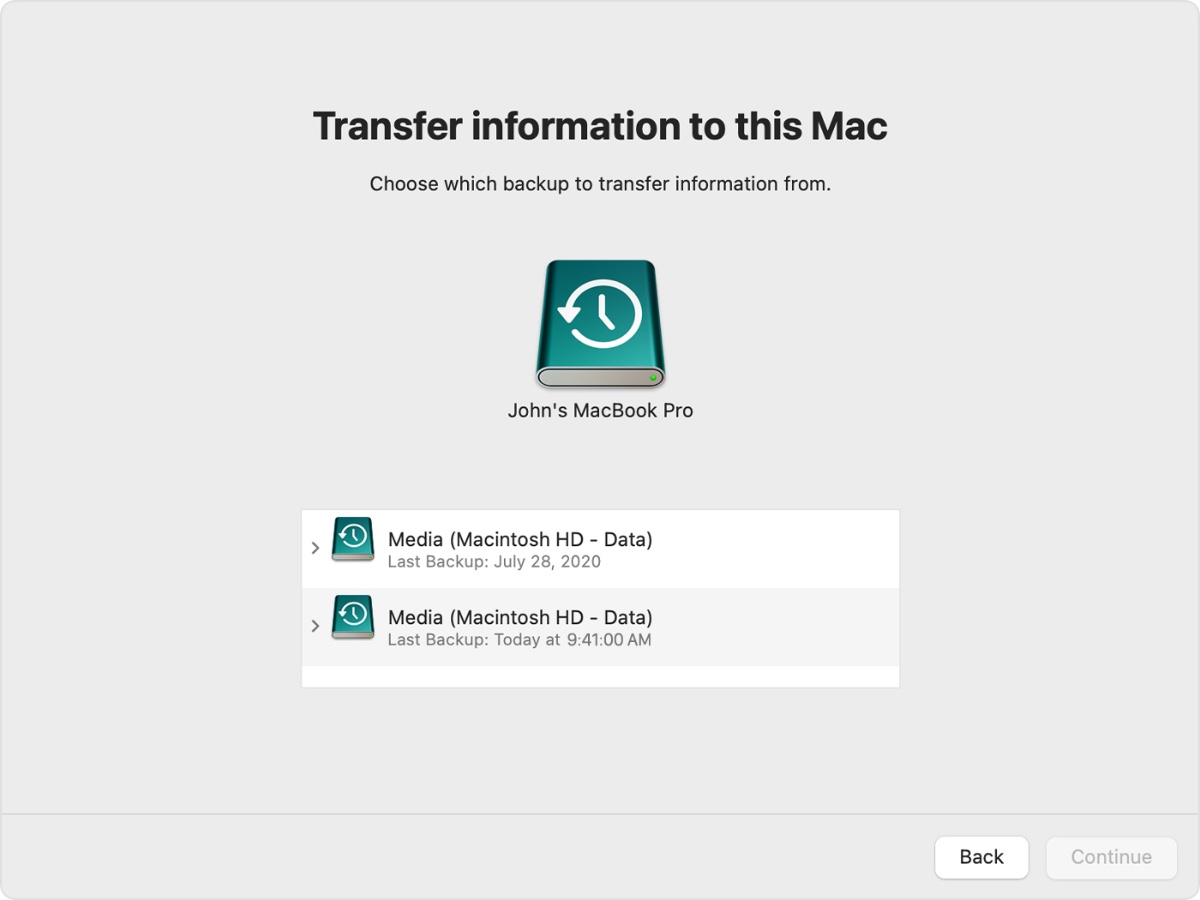
Step 5. Click on the Time Machine backup you had created previously and then click on the Continue button.
Step 6. Click on the Time Machine back up that you want to restore on your Mac and then hit Continue button.
Step 7. Choose the data that you want to transfer. Make sure the data you want to copy is checked.
Step 8. Before clicking Continue, learn what it means to transfer a user account.
a) Rename: As a result of renaming the account, it will appear as an additional user on your Mac, with a separate login profile and home folder.
b) Replace: The account on your old Mac will replace the identically named account on your Mac.
Step 9. Click Continue to start the transfer.
Note: Large transfers may take a few hours to complete and pause occasionally. Do not turn off your Mac during the transfer process.
After Migration Assistant is finished, quit Migration Assistant, then log in to the migrated account on your Mac to view its files.
There you go folks, this is how you can create Mac back up with Time Machine and restore a Mac back up with Migration Assistant.
If you have any questions regarding this guide, then let us know in the comments below.

