


If you are experiencing slow Wi-Fi speeds on your iPhone and want to improve its performance, then there are a few things that you can do on your device to make your experience better.
But before you begin and implement these changes on your device, make sure of the following:
- Your Wi-Fi is working properly and is connected to the Internet.
- Your iPhone is in range of your Wi-Fi’s signals.
- Your iPhone is running the latest version of iOS.
After making sure of these points, you can proceed with the steps below.
Improve Wi-Fi Speed on iPhone
- Launch Settings and tap on the Wi-Fi option.
- On the next page tap on your connected Wi-Fi network.
- Here make sure the toggle for Low Data Mode is turned off.
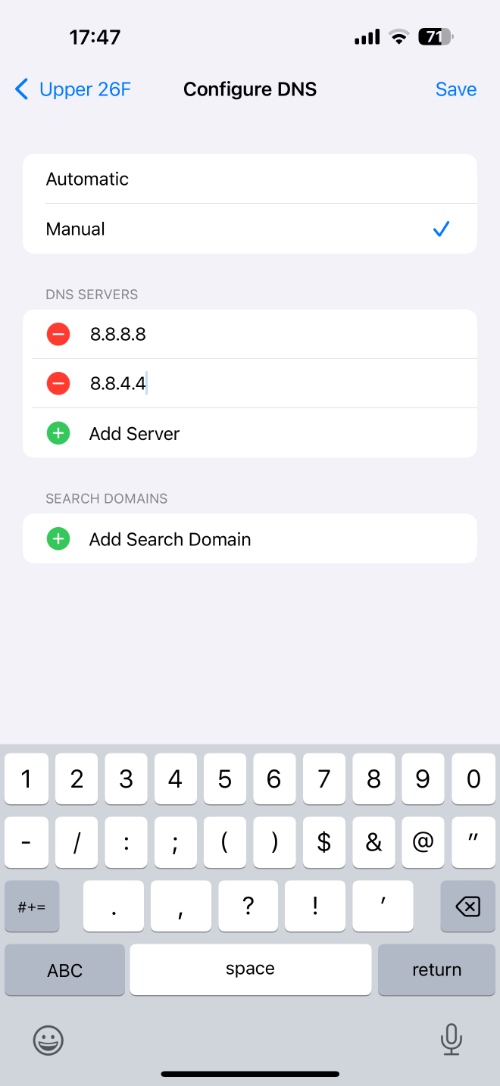
- Scroll down and tap on the Configure DNS option.
- On the next page select the ‘Manual’ option and delete the existing DNS server address.
- Tap on ‘Add Server’ and enter 8.8.8.8.
- Next, tap on Add Server once more and this time enter 8.8.4.4.
- Hit the ‘Save’ button from the top to save these changes.
After performing these steps turn on Airplane mode on your iPhone and turn it off. Finally, connect your device to the Wi-FI network once again and test if the Wi-Fi speed and performance have improved.
Reset Network Settings
If you are still experiencing connectivity and speed issues with your Wi-Fi network, then you can reset your iPhone’s network settings by following these steps.
- Open Settings and go to General.
- Scroll down and tap on Transfer or Reset iPhone.
- Next tap on the Reset option and from the menu select the Reset Network Settings option. You will be asked to enter your device’s passcode.
Doing this will reset iPhone’s network settings to factory defaults and hopefully fix any issues that your device has been facing.
There you have it folks, this is how you can make Wi-Fi fast on your iPhone and improve the experience of browsing the internet on your device. If you have any questions, then share them with us in the comments below.


Maybe just clarify that these are Google’s public DNS. Some of your operator’s services (Data and/or wifi) may no longer work.