


Is your iPhone giving errors while updating? If your iPhone won’t update to iOS 17, fear not. In this guide, we’re going to arm you with a toolkit of fixes to get it back on track.
Table of Contents
- Fixing the “iPhone Not Updating” Issue while installing iOS 17
- 1. Secure a Steady Internet Connection
- 2. Verify Device Compatibility
- 3. Address Insufficient Storage Space
- 4. Tackle Error Messages
- 5. Reboot Your iPhone
- 6. Delete and Redownload Update
- 7. Use iTunes or Finder
- 8. Monitor Server Status
- 9. Fixing Slow Update Progress
- 10. Activate Automatic Updates
- If All Else Fails: Restore Your iPhone
Apple constantly rolls out updates for iPhones to enhance performance, introduce new features, and enhance security. These updates are vital for keeping your device up-to-date and secure. However, it can be frustrating when your iPhone refuses to install an update due to various reasons.
The solutions given below will help you solve iOS 17 update issues, and allow you to smoothly install iOS 17 and iPadOS 17 updates on your device.
Fixing the “iPhone Not Updating” Issue while installing iOS 17
iPhone update problems can be vexing, but they are usually solvable. Start with the basics like checking your internet connection and available storage, and work your way up to more advanced solutions if necessary.
Let’s explore some common issues if your iPhone is not updating and simple fixes to get it back on track.
1. Secure a Steady Internet Connection
Maintaining a strong internet connection is a fundamental step in fixing iPhone update issues. By prioritizing Wi-Fi over cellular data and verifying your network connection, you’ll ensure a hassle-free update experience, keeping your device at its best.
Here’s how to fix the iPhone not updating issue caused by a poor internet connection:
- Locate and open the Settings app on your iPhone.
- In the Settings menu, find the “Wi-Fi” option and tap on it. This will take you to the Wi-Fi settings page.
- Ensure that the switch next to “Wi-Fi” is turned on. This step activates your iPhone’s Wi-Fi capability.
- Below the Wi-Fi toggle, you’ll see a list of available Wi-Fi networks. Locate your home or preferred network and tap on it.
Once you’ve selected your network, make sure there’s a checkmark next to its name. This checkmark signifies that your iPhone is connected to the chosen network.
2. Verify Device Compatibility

If your iPhone is not updating, ensure your iPhone is compatible with iOS 17 with the new update. Some older models may not support the latest iOS versions and thus your iPhone won’t update to iOS 17. Visit Apple’s website for the list of compatible iPhones.
3. Address Insufficient Storage Space
One of the most frequent roadblocks encountered during iPhone updates is insufficient storage space. This problem is particularly common on iPhones with limited memory, where every megabyte matters.
If you’re navigating the iPhone storage full cannot upgrade error, deleting unnecessary apps and data can create ample room for updates.
- Identify and uninstall apps you no longer use or need.
- Delete redundant photos, videos, and files that are consuming valuable space.
- Clear your Safari cache and browsing history.
- Check your Messages app and remove old text messages, especially those with large attachments.
4. Tackle Error Messages
Is your iPhone giving errors while updating? Sometimes, you may encounter error messages during updates, like “Unable to Check for Update” or “Unable to Verify Update.” These errors are usually related to connection issues or server problems.
Here’s what to do to fix the iPhone not updating issue:
- Ensure you have a stable Wi-Fi connection; look for the Wi-Fi signal icon.
- Tap Try Again and see if the update proceeds.
- If not, restart the update process from the beginning.
- If the issue persists, try updating on a different Wi-Fi network (avoid public networks like coffee shops).
5. Reboot Your iPhone
The simplest solution to the iPhone not updating issue is often the most effective. Want to know how to update your iPhone? Restart your iPhone by following these steps:
- On iPhones with a Home button, hold down the power button until you see “Slide to Power Off.” Swipe to turn off your iPhone and wait for it to shut down.
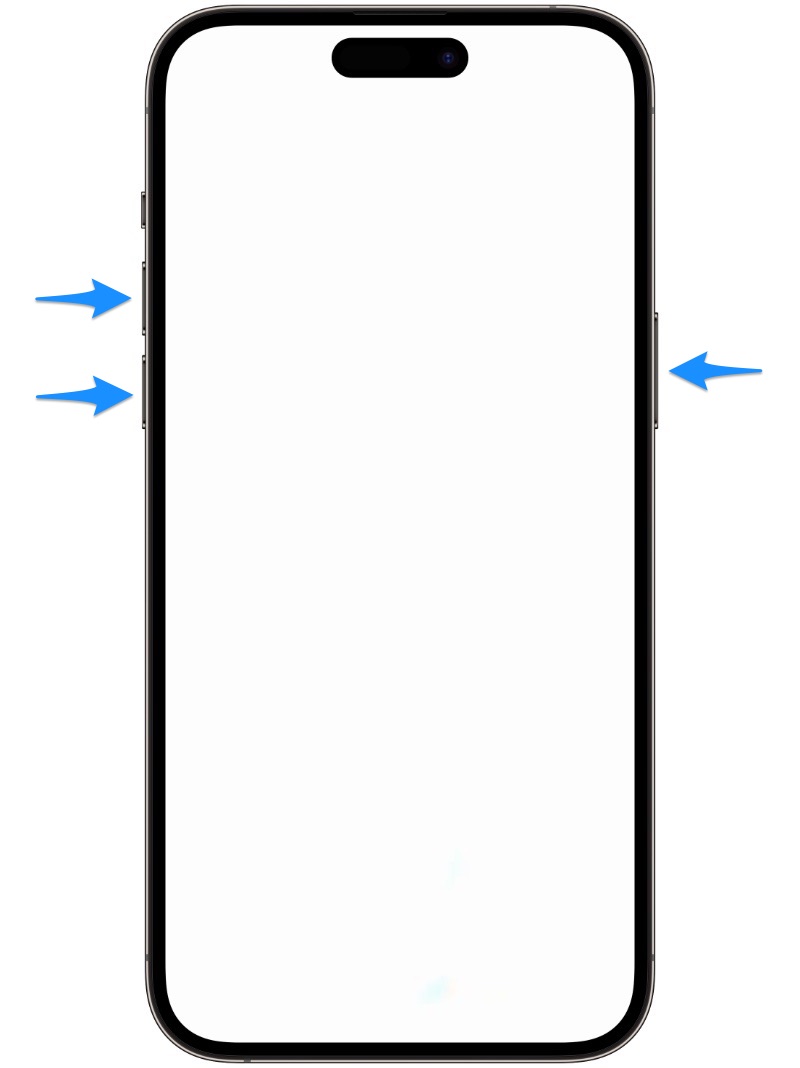
- On newer iPhones without a Home button, simultaneously press and hold the side button and one of the volume buttons until the slider appears. Slide it to turn off the device.
- Wait for 30–60 seconds, then power on your iPhone by holding down the power button or side button until you see the Apple logo.
6. Delete and Redownload Update
Sometimes, the culprit behind the iPhone not updating problem is not the update itself, but the downloaded update file. An occasional issue with this file can prevent your installation efforts. Here’s how to update your iPhone if this hiccup persists:
- Open Settings, tap on General, and then select iPhone Storage.
- Once inside iPhone Storage, look out for the iOS update file.
- Scroll through the list until you come across the iOS update. It should be evident by its file size.
- To bid adieu to this problematic update file, simply tap on it. A new screen will appear, and at the bottom, you’ll find the option to Delete Update. Go ahead and tap it.
Now, you’re ready to embark on a fresh attempt to acquire the update. Head back to Settings>General>Software Update, and let your iPhone download the update anew. This time, it’s ready to install smoothly and bring your device up to speed.
7. Use iTunes or Finder
When it comes to iPhone not updating issues, having access to a computer with iTunes or Finder can be a lifesaver. This method provides a reliable alternative if the iPhone won’t update to iOS 17 through the standard update process.
Here’s a step-by-step guide on how to make it happen:
Using iTunes for Updates:
- Launch iTunes on your computer.
- Connect your iPhone to the computer using a sturdy connection cable.
- As soon as your iPhone is recognized, navigate to the upper-left corner of the iTunes window and locate the iPhone icon.
- In the left-hand pane, find and click on “Summary.”
- On the right-hand side, you’ll spot an option that says “Check for Update.”
- After clicking that, you’ll be prompted to select “Download and Update” to kickstart the update installation on your device.
Using Finder for Updates:
If you’re running macOS Catalina or a newer version, Finder is your go-to tool for iPhone updates. Here’s how to do it:
- Connect your iPhone to your Mac.
- Open Finder.
- In the left-hand menu under “Locations,” you’ll see your iPhone listed. Click on it.
- Look for the option that says “Check for Update” and select it.
8. Monitor Server Status
Apple’s iOS updates attract a massive influx of users, all eager to download and install the latest features and enhancements. Thus, during major iOS updates, Apple’s servers may get overloaded due to high demand, causing the iPhone update issues. Be patient and check Apple’s server status on their website to confirm if this is the cause behind the iPhone not updating issue.
9. Fixing Slow Update Progress
If you’re wondering “Why is my update taking so long iOS 17?” fret not. Updating your iPhone can take some time, especially if the update file is large. Here are some considerations to keep in mind:
- Don’t disconnect from Wi-Fi or leave the network range during the update.
- Avoid using bandwidth-intensive activities on other devices sharing the same network.
- Ensure your iPhone has sufficient battery life or plug it in to charge during the update.
10. Activate Automatic Updates
Automatic updates are your iPhone’s silent guardians, ensuring it stays up-to-date without you even noticing. However, chances are, your automatic updates are turned off thus causing the “iPhone not updating” problem.
Don’t worry; it’s an easy fix. If your iPhone won’t update to iOS 17, here’s how to ensure your iPhone stays current:
- Locate and open the Settings app.
- Scroll down the Settings menu, and you’ll find “General.” Tap on it, and within this section, select “Software Update.”
- Among the options, you’ll find “Automatic Updates.” Tap on it to turn this feature on.
If All Else Fails: Restore Your iPhone
If nothing works, and your iPhone not updating issue persists, you may need to restore your iPhone using iTunes or Finder. Ensure you’ve backed up your data.
If you want to manually install iOS 17 on your device, then you can also download iOS 17 IPSW here.
Follow these steps:
Restoring Your iPhone in iTunes (macOS Mojave and older):
- Connect your iPhone to your computer.
- Open iTunes and select your device.
- Click Restore.
Restoring Your iPhone in Finder (macOS Catalina and newer):
- Connect your iPhone to your Mac.
- Open Finder and select your iPhone under Locations.
- Click Restore iPhone.
A restore erases your iPhone, installs the latest iOS version, and may resolve persistent issues.
If even a restore doesn’t work, consider a DFU (Device Firmware Update) restore or consult Apple for possible hardware problems.

