


Due to constant breaches of privacy from large corporations and the government alike, anonymous web browsing is not just limited to hackers anymore. In fact it has become necessary for anyone who cares about his or her privacy and wants to keep their personal information to themselves. Thankfully browsing the web anonymously on an iPhone or iPad isn’t as complicated as it may sound. All you need is a simple application, need to follow a few simple steps to set it up and remember to turn on VPN app of your choice before you start using the internet.
You can not only browse the internet anonymously but also gain access to web pages and services that are blocked or not available in your country. In this article we will show you how to do truly anonymous web browsing from your iPhone or iPad. Just follow the simple instructions below.
Choosing A VPN App And Adding Configurations
- The first thing you need for the anonymous web browsing on iOS is a VPN app. You can find a good one from our list of best VPN apps for iOS here. There are plenty of options in the App Store, just search for VPN.
- Once you have downloaded the app open it. The app will ask you to add VPN Configurations. Tap on ‘Allow‘.
- Now VPN section of the Settings app will open. Your device will ask you to scan your finger in order to authorize the adding of VPN Configurations. Once you do so, the VPN app will be all set to go.
Now that your favorite VPN service has been added to your device you have two options. You can either choose to manually enable the VPN app every time you want to browse anonymously or you can enable the On-Demand option from settings, following the steps below.
Enabling Connect On Demand VPN Settings
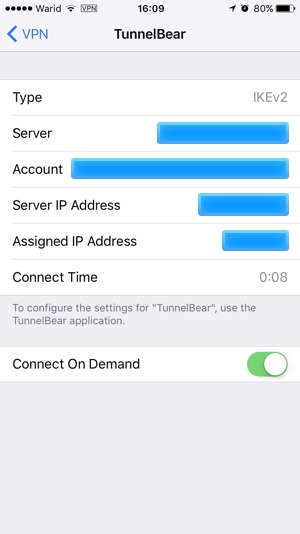
- Open Settings app on your iPhone or iPad and go to ‘General‘.
- Scroll down and tap on the ‘VPN‘ option.
- On the VPN screen you will see a list of VPN services that have been installed on your device. Tap on ‘i‘ button for the VPN app you want to use on-demand.
- Finally enable the toggle for ‘Connect On Demand‘. This will enable this VPN service every time you need to access the internet.
While the Connect On Demand feature adds convenience do note that you will run out of available bandwidth quickly when this option is enabled, something users with limited VPN accounts should keep in mind.

