With the increased security concerns of iPhone users, today we realize the need for two-factor authentication. Without any doubt, it gives you an extra sense of security. When it comes to two-factor authentication on Apple ID you also need to make sure you continue to have access to your trusted devices and phone number as no one would want to get locked out of their Apple device simply because they don’t have the trusted device to approve two-factor authentication.
How To Approve iPhone Device
Two-factor authentication is a mechanism to protect your Apple ID from being misused if your data or device gets stolen and falls into the wrong hands. Whenever you try to authenticate your Apple ID on a new device or sign in to the Apple website, a code is sent to the trusted Apple device such as iPhone, iPad, Mac or your phone number. When you see a message to approve your iPhone once you have enabled two-factor authentication, it means that you have turned it on using your Apple account.
To get authentication code on an iPhone, iPad or iPod touch you need to approve it first. Once an iPhone is approved for two-factor authentication it can start receiving codes to approve sign ins.
In this article we will show you how you can approve a new device for two-factor authentication and start receiving codes on it.
Looking to make iPhone more secure? Then read our guide here.
Approve Two-Factor Authentication Using Another Device:
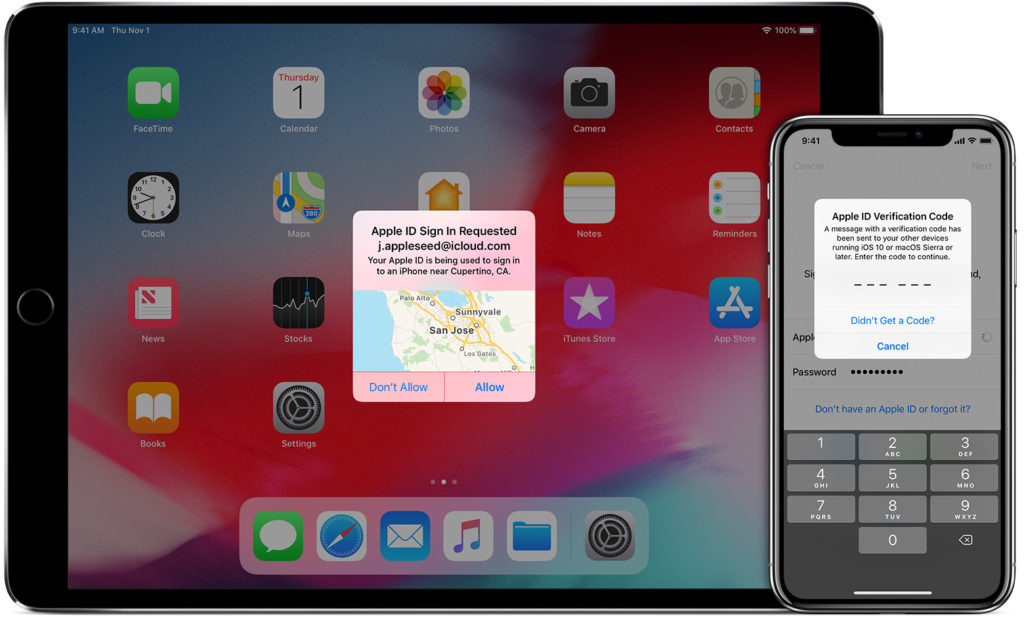
The easiest way to approve your iPhone is by using a verification code you receive by Apple. Once you try to log in the new device, the following is what you should be doing:
- Open one of your trusted devices. This can be a device that has previously been approved.
- On the screen of your trusted device, you will receive a notification of a new sign-in attempt on your iPhone. Select ‘Allow’ to see a code.
- Enter the code displayed on your trusted device on the device you are trying to approve.
Approve Your iPhone Via Text or Call:
In case you cannot access your trusted device, you can always avail of the option of approving your device through text or call. You can send the verification code by sending an SMS or making a call to your trusted number that is also added in the two-factor authentication set up procedure.
Here is what to do:
- Select ‘Didn’t Get A Verification Code’
- A pop up will occur on your screen and select send the code to your trusted number.
- Your trusted phone number will receive a text or a call. Type the code you see or hear on call on your new Apple device in order to complete the process.
Get A Code Using the Settings Menu:

In case you are unable to receive automatic codes and cannot take a call or text, you can go to the Settings menu of your trusted device to create a code. You can do it despite your trusted device is offline. This way you can manually generate an authentication code and enter it on your new device in order to add it to your approved devices list.
For this, you need to do the following:
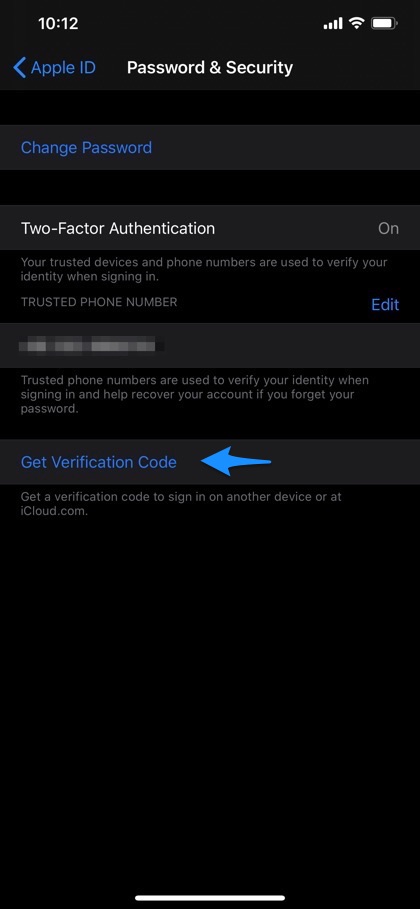
- On an iOS device that is already trusted go to Settings and tap on your name from the top. If you have an older device, you may need to tap iCloud and find your name on the menu.
- After this, go to Password & Security
- Go to ‘Get Verification Code’ and choose OK.
Now here you go. You have successfully approved your iPhone on two-factor authentication.
Was this post useful? Share your views with us below. For more useful posts for your device, stay tuned to iOSHacker.com


