In this step by step tutorial we show you how you can enable or disable elevated heart rate feature on your Apple Watch and change the BPM threshold after which you will be notified with an alert.
watchOS 4 brought the super useful Elevated Heart Rate feature to Apple Watch, which enables the Watch to notify user with a push notification when his or her heart rate goes up than a certain reading point. When the Watch automatically detects that user’s heart rate has gone up even though they are not actively working out for the past 10 minutes, it notifies them with an alert. There have been many instances when this particular notification prompted users to seek medical help and as a result it saved their lives.
The Elevated Heart Rate feature is not supported on all models of Apple Watch, however if you have Apple Watch Series 1, Series 2 or Series 3 then this feature will work. The only Watch model that is not supported is the original Apple Watch that is also commonly known as Watch Series 0. The feature is available on both GPS and LTE versions of Series 3.
Enable or Disable Elevated Heart Rate
To enable or disable elevated heart rate notifications you can follow the steps below.
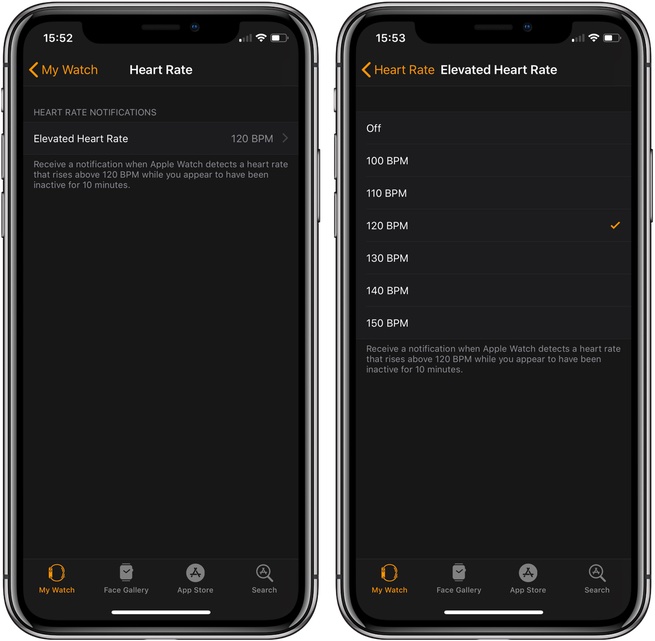
- On your iPhone launch the Watch app.
- Now go to Heart Rate > Elevated Heart Rate.
- Now you will be given a threshold for Elevated Heart rate with options ranging from 100BPM to 150BPM. Choose the option that suits you the best.
Once you have selected the Elevated Heart Rate for your Watch, it will notify you when your heart rate exceeds this particular reading while you are not doing energy intensive tasks and have been inactive for the past 10 minutes.
You can also turn off the Elevated Heart Rate alerts by simply selecting ‘Off‘ from the list. [via]


