


In this blog, we’re discussing everything related to iPhone backups – why they’re absolutely essential, how to do them like a pro, and some of the best practices to follow.
Life is as unpredictable as it gets, and iPhones, well, have a knack for surprising us at the worst possible moments, in the worst possible ways. Whether it’s taking a dive into the pool or deciding to glitch out randomly, the iPhone sure does have a flair for the dramatics. And let’s be real, whatever the case may be, losing all your data in one fell swoop is so early 2000s. Nobody should be going through that stress in this time and age.
That’s why we backup iPhones, to avoid all this drama. So, the next time your iPhone decides to pull a disappearing act or just needs a little TLC at the Genius Bar, your data will remain safe and sound.
What is iPhone Backup?

iPhone Backup is your digital safety net, allowing you to copy and securely store all the important information from your iPhone, iPad, or iPod touch. If you ever need to replace your device, a backup ensures that you can effortlessly transfer all your data to your new device without missing a beat.
iCloud backup
One of the key players in this backup iPhone game is iCloud Backup. It swoops in to make a copy of all the information on your iPhone, iPad, Mac, and even your Apple Vision Pro that isn’t already synced to iCloud. This includes photos, videos, messages, app data, Apple Watch backups, and more.
As for syncing, it’s having your data on multiple devices at once. For instance, think iCloud Photos, iCloud Drive, or Notes. Whenever you make a change on one device, it automatically updates across all your devices, keeping everything in harmony.
iCloud backup and syncing go hand-in-hand. You see, iCloud takes periodic snapshots of unsynced data, ensuring that it’s always ready to be restored whenever you need it.
iTunes backup
Then there are computer backups. These allow you to create backups of your iPhone or iPad on your computer with the help of Finder on Mac and iTunes on Windows. iOS computer backups are locally stored on your computer’s hard drive and can be restored on the device with a USB cable.
As opposed to iCloud backups, which are updated automatically, you have to physically connect your iPhone to your computer with a cable to create a fresh copy of your computer backup. All of your data, such as photos, videos, app data, documents, notes, messages, health data, keychain data, and more is stored in your computer backups.
What’s the Importance of Creating iPhone Backups?
Even though creating backups of your iPhone data is very important, in a recent survey on people’s data backup habits, ExpressVPN found that around 22% of the respondents don’t even back up their data, while 38% admitted to losing important data due to not backing up. Those are some massive numbers.
Creating backups for your iPhone might seem like just another tech task, but let us tell you, it’s way more important than you might think. I mean, think about it: your iPhone stores everything for you, from precious memories to important contacts and documents.
What will you do when something bad happens, and you lose it all? Without a backup, you risk losing everything. This includes your photos, messages, contacts, you name it. Would you be okay with your digital life wiped clean in an instant? We think not.
For this very reason, Apple baked powerful backup services right into iOS, offering two types of backups: local backups with iTunes or third-party software and iCloud backups. With a full backup of your device, you can rest easy knowing that all your data is safe and sound, ready to be restored at a moment’s notice. From photos and videos to notes and messages, a backup ensures that nothing gets left behind. And let’s not forget about the convenience factor. Setting up a new device is easy when you have a full backup on hand.
How Often Should You Backup Your Data?
The frequency of backing up your iPhone data depends on your usage and how often you create or modify content. As a general rule of thumb, it’s recommended to back up iPhone the right way regularly. We’re talking at least once a week, but ideally, you’d want to do it every day. Yup, that’s right, every twenty-four hours. Especially if you frequently update or create important data, such as photos or documents, consider backing up your iPhone more frequently to ensure nothing is lost.
How to Backup iPhone the Right Way
Apple provides powerful backup iPhone services within iOS, offering two primary methods: iCloud backups and local backups via iTunes or third-party software. While iCloud offers convenience, its limited free storage may not be sufficient for many users. On the other hand, local backups provide greater control, faster backups, and no recurring costs.
Now that we understand the importance of iPhone backups, let’s delve into the simple steps to learn how to backup your iPhone.
You can learn about the difference between iCloud backup and iTunes backup in detail here.
How to Backup iPhone on iCloud
Backing up your device with iCloud is super convenient, as there’s no need to fuss with cables or computers. As long as you’ve got a Wi-Fi connection, you’re good to go.
But before that, what does iCloud backup include? Well, when we say iCloud backups include everything, we mean it. We’re talking device settings, your carefully crafted Home Screen layout, and all those little details that make your iPhone feel like home. Plus, it also saves your Apple Watch backups, photos, videos, messages, and app data. Basically, it includes everything you’d want to keep safe and sound.
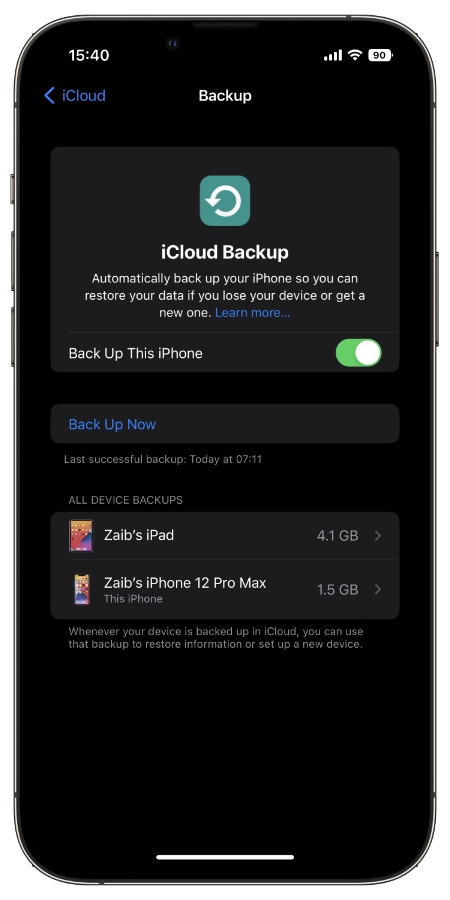
So, how do you go about backing up your iPhone on iCloud? Easy peasy. Just follow these simple steps:
- Open up your Settings app and tap on your name.
- Select iCloud, then iCloud Backup.
- Toggle the switch to turn on iCloud Backup.
- Finally, tap “Back Up Now” to kick off the backup process.
Running Low on iCloud Storage? Here’s What to Do:
- Consider buying additional iCloud storage for as little as $0.99 per month.
- Delete unnecessary data already backed up to iCloud to free up space.
- Navigate to Settings > Your Name > iCloud > Manage Storage to manage your iCloud storage.
In case your iCloud backup fails, try this guide.
How to Backup iPhone On Computer via Finder (MacOS Catalina or newer)
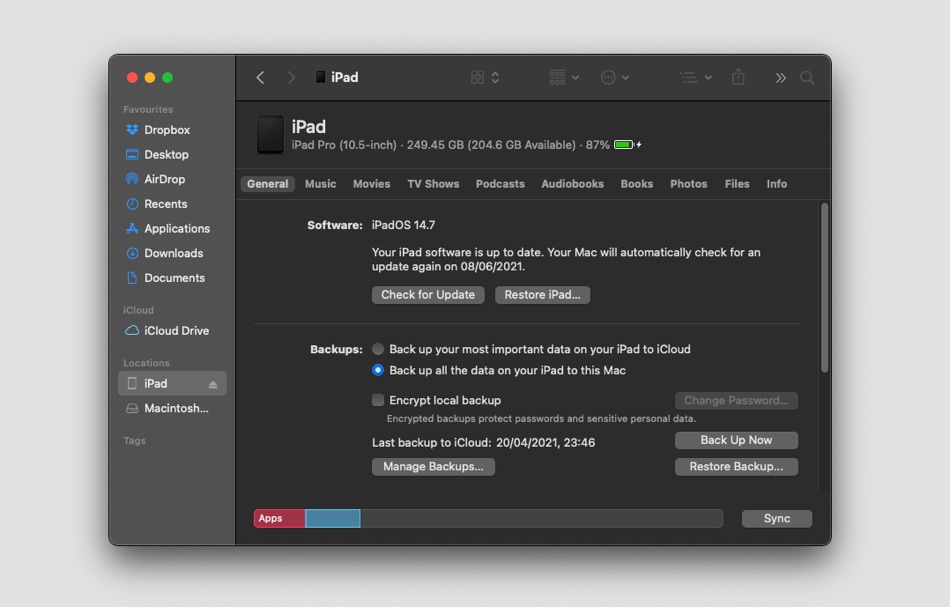
If you’re using a Mac running macOS Catalina 10.15 or a newer version, you’ll handle your iPhone backups through Finder. Here’s a simple guide to get it done:
- Connect your iPhone to your Mac using a charging cable.
- Open Finder on your Mac.
- Look for your iPhone under Locations in the Finder sidebar and click on it.
- Scroll down to the Backups section.
- Click on “Back up all of the data on your iPhone to this Mac”.
- Finally, click “Back Up Now” to start the backup process.
The backup usually takes around 15 to 20 minutes. You’ll know it’s complete when you see the current date and time next to “Last backup to this Mac”.
How to Backup iPhone On Computer via iTunes
With the release of macOS Catalina 10.15, iTunes was replaced by Music. Now, tasks like syncing, backing up, or restoring your iPhone are handled through Finder. Don’t worry though, despite the change, the process remains quite similar, and you’ll find the interface familiar.
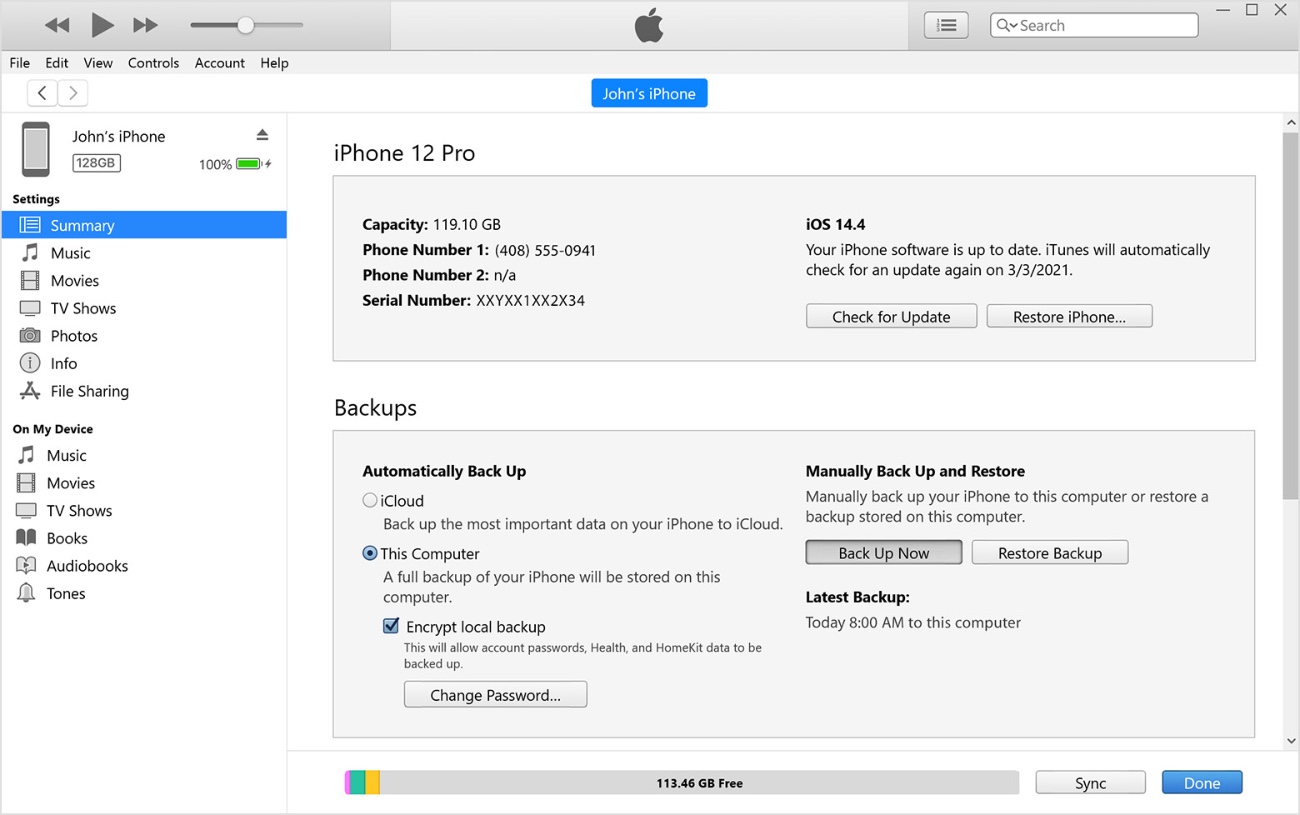
For users with a PC or a Mac running macOS Mojave 10.14 or earlier, you’ll continue backing up your iPhone using iTunes.
- Connect your iPhone to your Windows computer using a Lightning cable or USB.
- Open iTunes.
- Click on the iPhone icon near the upper left-hand corner of the screen.
- Next to “Backups”, click the circle next to “This computer”.
- Click “Back Up Now” to initiate the backup process.
- Once finished, you’ll see the time and date of the latest backup under “Latest Backup”.
iPhone Data Backup Best Practices
Ensuring your iPhone data stays safe and sound is crucial in today’s digital age. Follow these simple best practices to backup iPhone and keep your valuable information secure:
1. Regular Backups
Make it a habit to back up your iPhone regularly, whether it’s to iCloud, Finder, or iTunes. This ensures that your data is always up to date and accessible in case of emergencies.
2. Choose the Right Backup Method
Decide whether iCloud or local backup suits your needs best. iCloud offers convenience while local backups offer faster, cheaper, and more granular backup options. Additionally, local backups present a cost-effective alternative, devoid of recurring storage expenses.
3. Monitor iCloud Storage
Keep an eye on your iCloud storage space to prevent running out of room for backups. While iCloud offers seamless backups, its free 5 GB storage limit may prove insufficient for many users. Consider upgrading your iCloud storage plan or managing existing data to ensure uninterrupted backups.
4. Be Mindful of Cellular Backup:
Avoid using cellular data for iCloud backups to prevent exceeding your data plan. Stick to Wi-Fi connections for safer and more cost-effective backups.
- Go to Settings
- Tap on Your Name
- Select iCloud
- Go to iCloud Backup and turn off Back Up Over Cellular.
5. Encrypt Your Backups
Consider encrypting your backups for added security, especially if they contain sensitive information like passwords or health data. Do remember to choose a strong, memorable password for encrypted backups to mitigate any potential complications.
Start Backing Up Now
The importance of backing up your iPhone cannot be overstated. It safeguards your precious memories and vital information and eases the transition to a new device. While iCloud offers convenience, local backups stand out for their affordability, speed, and transparency. Moreover, with local backups, you’re not bound by storage limitations, and you have the flexibility to access and manage your data as you see fit.
However, whether you opt for iCloud or local backups, the key is to make it a habit. With simple steps and powerful tools at your disposal, there’s no excuse to leave your data vulnerable. Start backing up today and ensure peace of mind, knowing your digital life is secure.

