Do you use Apple’s Mail app on your Mac? There’s a possibility that you’re wasting gigabytes of space by storing attachments that you could be using.
Now, are you wondering how to stop the mail app from wasting space? Well, let’s take action.
Determine How Much Space Mail is Taking Up
The Mail app caches all offline emails and attachments you have ever received by default. Depending on how many emails you have, this could take up tens of gigabytes of storage. If your Mac has a large hard drive, it will not be an issue. However, this can be a significant waste of space on a MacBook with a 128 GB SSD.
Taking a look at the source of your email attachments will help you determine how much space you might be wasting. The Library folder on your Mac has a Mail directory for each user account: ~/Library/Mail, or /Users/[NAME]/Library/Mail. Every user’s data is stored in this section of the Mail app.
Here are the steps to see it:
Step 1. Navigate to the Finder
Step 2. Choose “Go to Folder” from the “Go” menu bar.
Step 3. Enter ~/Library into the box and press Return.
Step 4. Select “Get Info” from the right-click menu or control-click menu of the Mail folder.
Step 5. Under “Size,” you can see how much space the Mail app is using.
Close the Mail Info window and the Library window in Finder when you are finished. You should take one of the following actions if you find that Mail is taking up more space than you expected.
Method 1: Reduce Mail App’s Disk Usage on Mac

The Mail application downloads every single email and attachment to store them on your Mac, consequently, Mail’s library folder usually runs short of space. Then Spotlight can index them for easy searching and make them accessible offline. Nevertheless, if you have a large number of emails in your Gmail account or elsewhere, you may not want them all on your Mac.
The good news is that Mail can save you some space by telling it not to automatically download attachments.
Here is how to do it:
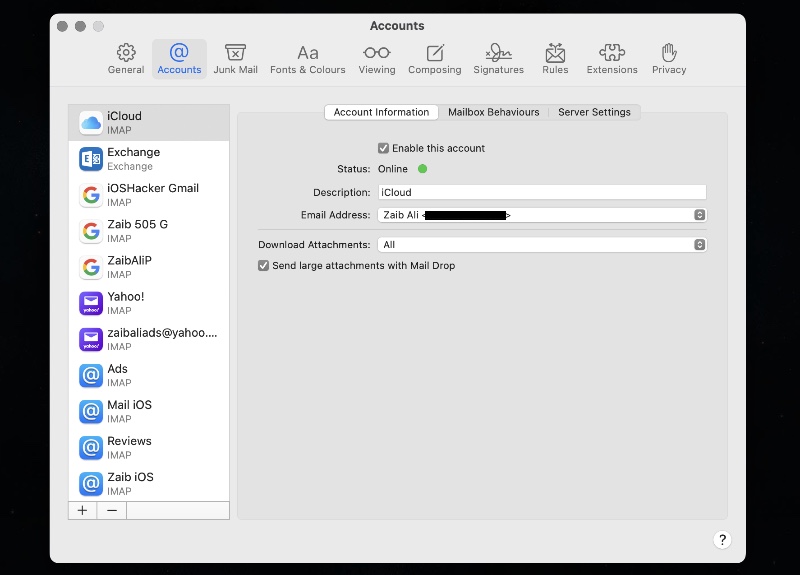
Step 1. In the Mail App, click on “Preferences” under “Mail” in the top menu bar.
Step 2. Click “Accounts” when the preferences window opens.
Step 3. Then click the drop-down menu beside “Download Attachments” and choose “None.”
Mail attachments won’t be automatically downloaded when you set it up, instead, they will be stored online for you to access as needed.
If this is not possible, you can only control the amount of messages Mail downloads by changing the settings on your email server. With Gmail, for instance, you can “hide” emails from the Mail app and other email clients that use IMAP.
Follow these steps to access this setting:
Step 1. Click on the gear menu in the Gmail web interface, select “See All Settings,” then click the Forwarding and POP/IMAP tab.
Step 2. Under “Folder Size Limits,” you can opt for an option to the right of “Limit IMAP folders to contain no more than this many messages.” In this way, the mail app won’t be able to see or download all your emails.
The options may be similar in other email services as well.
To receive and send emails, you could also stop Mail from using IMAP and rig it up to use POP3 and SMTP. As a result, deleting emails from your Mail app would remove them from your computer, but not from your email server. In a modern email system, POP3 isn’t ideal, but with Mail, you can receive email notifications and send messages, while your archive remains on the server.
Method 2: Stop Using Mail and Switch to Something Else
You will not be able to completely disable Mail’s space-wasting behavior, so you might want to stop using the Mail App. After deleting those gigabytes of locally cached data, Mail will not attempt to download any more emails.
You can also use your email service’s web-based interface, such as Gmail on the web for Gmail users. Another option is to use a third-party email client available on the Mac App Store or elsewhere. It would be helpful if other email clients offered an option to store fewer emails offline and make your cache smaller.
If you want to stop using Mail, follow these steps:
Step 1. Deactivate or delete all of your email accounts.
Step 2. In the Mail app, select “Accounts” from the “Mail” menu.
Step 3. If you no longer want to use Mail with an account, uncheck the Mail option for that account. Mail will no longer download emails from those accounts.
Nevertheless, this is not enough!
You will no longer see the emails in the Mail app if you disable the email account, but they will still be stored in your offline cache. To free up space, you can delete the folder.
Don’t forget to make backups before deleting emails on your Mac in case you accidentally delete important ones. The emails won’t be recoverable if they aren’t still on the server!
To do this,
Step 1. Go to Finder, click the “Go” menu, then click “Go to Folder.” Plug ~/Library/Mail/V2 into the box and press Return.
Step 2. Then right-click or control-click on the folder containing your email address and choose “Move to Trash.”
After that, you can purge your trash to make room for the gigabytes you’ve freed up.
You should delete each corresponding folder if you have multiple email accounts with cached emails you wish to remove. If you use a modern email service, you won’t lose your offline mail if you do this, but it will still be on your email server.
Closing the Mail Library folder in Finder will complete the process.
Final words
Some people suggest creating a separate email account to archive emails. To save space, forward all your emails there and then delete them from your “working” email account in Mail.
However, that’s a dirty hack, and you might just be better off using another email client instead if you need to go that far.
May the odds be in your favor!


