If you use Google Sync for personal or corporate accounts and want to set up your account with your iPhone or iPad, then you have come to the right place. After setting up Google Sync on your device using the steps given in this guide, you will be able to synchronize your contacts, mail and calendars with your devices. You will also be able to set up alerts for messages and upcoming meetings. Accounts that have been enabled for Google Apps for work, Government and Education domains can be be setup using this guide.
Before you begin setting up Google Sync on your iOS devices make sure you have created a fresh backup of your calendars and contacts on iTunes. You might also have to set your device’s default languages to English (US) to be able to access m.google.com server.
Adding a Google Sync account to iOS
Step 1. On your iPhone, iPad or iPod touch open the Settings app and go to Mail, Contacts, Calendars option.
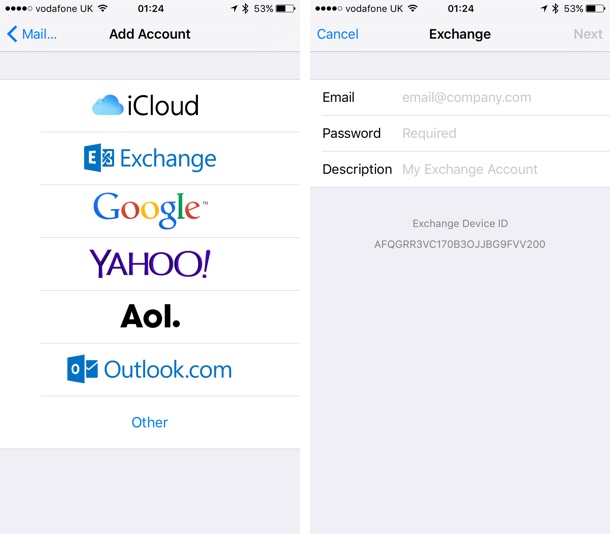
Step 2. Now tap on ‘Add Account‘ option and tap on ‘Exchange‘.
Step 3. Next enter your email address and password. Optionally you can also add description for the account. Once you are done simply tap on ‘Next‘ button.
Step 4. Now in the ‘Server‘ field type ‘m.google.com‘. Leave the ‘Domain‘ field empty.
Step 5. Type in your full Google Apps email address in the ‘Username‘ field and then password (if it is not entered already).
Step 6. Hit the Next button to proceed.
Note: If you are getting the ‘Invalid Password’ error then you have to do the CAPTCHA test. Go to this link to solve this. Also, users who use 2-step verification on your Google Apps account, then you have to enter Application-specific password instead of your regular password.
Step 7. Finally from the list enable the toggles for items you want to sync with your device including Mail, Contacts and Calendars and hit the ‘Save‘ button.
There you go, now you know how to setup Google Sync on your iPhone, iPad or iPod touch to make Google for Work accounts work on your iOS device.


