


This is your super guide for solving all iPhone network issues in 2019. In this article we have looked at all possible problems that iPhone users regularly face when it comes to network connectivity and have given proven strategies that can be immensely helpful in fixing the network problems on iOS devices.
This super guide will help you in solving your cellular and Wi-Fi network problems no matter if you have an iPhone XS, iPhone XS Max, iPhone XR, iPhone 8, iPhone 7, iPhone 6s or iPhone 6. The W-Fi section of this comprehensive guide will also help iPad and iPod touch users.
This us an up to date guide and works with all versions of iOS including iOS 7, iOS 8, iOS 9, iOS 10, iOS 11, iOS 12 and iOS 13.
What Are iPhone Network Issues?
iPhone network issues are caused when your device is not able to connect to your cellular network or Wi-Fi network. An iPhone will give you No Service or Searching error when it is having cellular connectivity problems. Such issues can be very frustrating for the user as they are not able to make any phone calls or connect to the cellular Internet.
There are many ways that allow you to solve all iPhone network issues that you are facing with your device, and restore the cellular and Wi-Fi network of your smartphone. In this guide we will show you all the ways that can be beneficial in activating your cellular connectivity. In the second part of this article you will learn how you can solve the Wi-Fi issues with your iPhone, iPad or iPod touch.
The solutions
- Toggle Airplane Mode
- Reboot your iPhone
- Update your Carrier Settings
- Eject and reinsert your SIM card
- Reset your Network Settings
- Update to latest iOS version
- Check if your iPhone is carrier locked
- Toggle Wi-Fi Off And On
- Check if you have Internet Connectivity and Restart Router
- Remove Wi-Fi Network and add again
- Reset your Network Settings (Wi-Fi)
- Enable Auto-Join for your Wi-Fi network
Part 1: Solving Cellular Network Issues with iPhone
In this section of our ultimate guide for solving all iPhone network issues we will be fixing cellular network issues with your iPhone. Follow each of the steps detailed below and hopefully by the end of this guide you will have an iPhone that lets you connect to your cellular network.
With these steps you will be able to solve SIM not working with iPhone issues, connection drops, iPhone not able to make or receive phone calls, No Service errors, iPhone Searching for network issues and more.
1. Toggle Airplane Mode

The first and easiest thing that you should do, which could result in restoring your iPhone’s network connectivity and solving No Service iPhone problem is toggling the Airplane Mode on and off. When you turn on the Airplane mode of your iPhone its radio-frequency signal transmission is suspended. So when you turn it back off your iPhone will turn on its radio-frequency signal transmission and look for cellular signals again. This could result in connecting your iPhone to its network. You can quickly toggle the Airplane mode on your iPhone by accessing the Control Center (swipe down from top right corner of the screen) and then tapping on the ‘Airplane’ button.
Toggling Airplane mode can also be helpful when your iPhone is not giving full signal. When you turn it on and back off your iPhone can get a better reception.
2. Reboot your iPhone
If toggling Airplane mode does not activate cellular network on your iPhone, then don’t worry as rebooting it might be more helpful. Simply restart your iPhone by long pressing the Power and Volume Up buttons and then slide to power off. Once the device has turned off completely you can reboot it by pressing and holding the power button. If your iPhone’s power button is not working, then you can also go to Settings > General and scroll all the way down to tap on the ‘Shut Down’ button.
You also have the option to force reboot your iPhone in case normal shut down methods are not working or your device is stuck or frozen. You can force reboot a modern iPhone by following the simple steps below.
- Press and release the Volume Up button.
- Then press and release the Volume Down button.
- Now press and hold the Power/Lock button.
- Keep the power button pressed until you see the Apple logo.
For older models that have a home button, you can follow this guide to force reboot your iPhone 8, 7 or 6s.
3. Update Your Carrier Settings
Another and possibly more effective way to solve iPhone No Service or Searching errors is by updating your carrier settings. Most carriers change their settings and automatically push them to your iPhone, however sometimes settings are not automatically pushed to your device and you are left with connectivity issues. You can solve such problems by updating your carrier settings manually. To do so, simply open Settings > General And go to About page. As soon as you access the About page iPhone will prompt you about updating your carrier settings. Simply tap on ‘Update’ option and iPhone will update your carrier settings for you.
4. Eject and reinsert your SIM card
This might sound like a simple solution but it is also one of the most effective. Go ahead and eject your SIM card from iPhone’s SIM tray and insert it back in. When you do make sure you are placing the SIM card on the SIM tray properly and then put the SIM card back into your iPhone. If you have a dual-SIM iPhone XS Max, then make sure you insert the SIM card even more carefully, exposing the golden part of the SIM on both top and bottom sides of the tray. Your iPhone should detect the SIM card as soon as you place it inside the iPhone and connect to your network right away.
5. Reset your Network settings

Next thing you should try to solve No Service errors on your iPhone is resetting its network settings. Doing so will restore iPhone’s network settings to their original configuration and hopefully end up solving any connectivity issues that may be caused due to wrong settings. You can reset your iPhone’s network settings by going to Settings > General > Reset and from there tapping on the ‘Reset Network Settings’ option. You will be asked to enter your iPhone’s passcode before you can proceed to reset your network settings.
6. Update to latest iOS version

Updating to latest version of iOS is perhaps the most underrated troubleshooting technique out there. Apple regularly releases new software updates for all its devices, and these new releases often contain bug fixes for various iPhone functions. Make sure your iPhone is running the latest available iOS version to make sure all the bugs are fixed on it. You can check your iPhone’s current iOS version by opening Settings > General > About. There you will the ‘Software Version’ for your device. If your device needs to be updated, then you can update your device to the latest version by going to Settings > General > Software Update.
7. Check if your iPhone is carrier locked
If you have got a new iPhone that was resold to you or given away by a relative, then chances are the device may be carrier locked. When an iPhone is carrier locked you are only able to use the SIM card from a particular network with it. All other networks simply don’t work with that particular device, as opposed to a factory unlocked iPhone, which works with all networks worldwide.
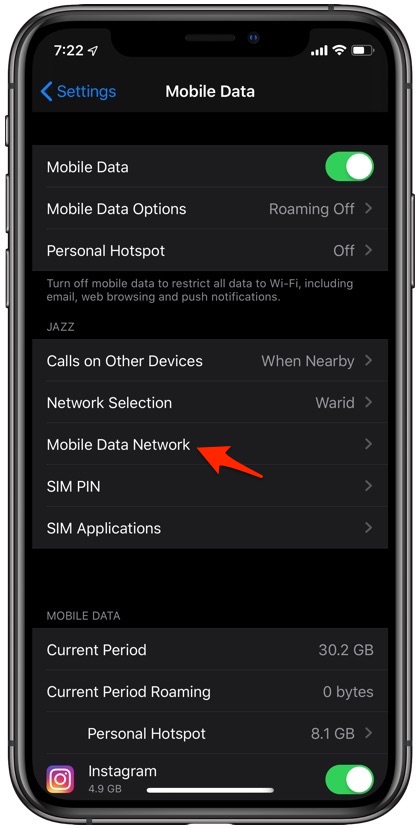
The easiest and simplest way of checking whether your iPhone is carrier locked according to MacWorld is by going to Settings and then to Mobile Data. If on Mobile Data screen you get the option saying Mobile Data Network, then your iPhone is most probably factory unlocked, as this option is only available on unlocked iPhones. If the device does not have this option then chances are your iPhone will only work with its original network provider, unless you get it unlocked by paying that network’s fees.
Note: If you have an iPhone 7, then it is a good idea to check with Apple if your device falls into their iPhone 7 repair program for “no service” issues program. You can check eligible iPhone 7 models and have yours repaired free from Apple Store or Apple’s Authorized Service Providers.
By following these steps you should be able to fix no service on iPhone, and gotten rid of iPhone searching for networks constantly. Feel free to use the comments section below to let us know if you have any questions.
Part 2: Fixing Wi-Fi Connectivity Issues
Having Wi-Fi network problems on an iPhone, iPad or iPod touch can be equally annoying for iOS users. Not having Wi-Fi connectivity on your iOS device renders it almost useless since most apps and things we do on our iOS devices requires a Wi-Fi network. Thankfully fixing Wi-Fi issues on an iPhone or iPad is relatively easy, and that is exactly what we are going to demonstrate to you in this second part of our ultimate guide for solving iPhone network issues in 2019.
With these steps you will be able to solve issues such as iPhone Wi-Fi not working, Wi-Fi connected but websites won’t load, iPhone disconnecting from Wi-Fi and more.
8. Toggle Wi-Fi Off and On
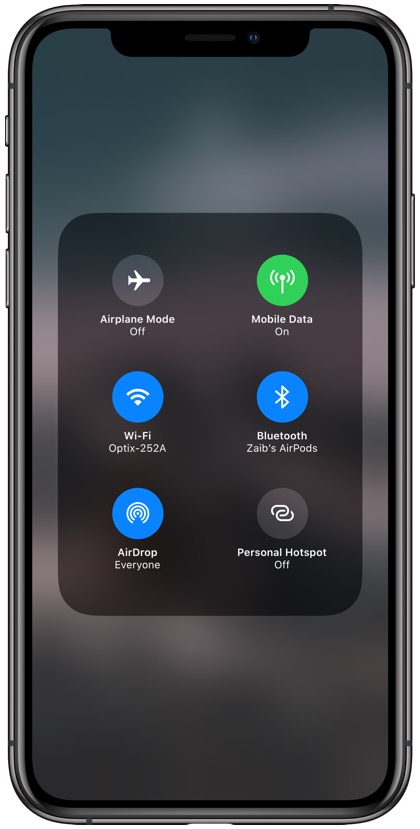
The simplest yet most effective way to restore Wi-Fi connection on any device including an iPhone or iPad is simply turning off Wi-Fi and then turning it back on. You can quickly turn off Wi-Fi network on your device by access the Wi-Fi toggle from the Control Center (Swipe down from top right corner of the screen). When you turn off your Wi-Fi network it instantly disconnects from any Wi-Fi networks it is connected to and then reconnects as soon as you turn it back on. Doing this can effectively solve Wi-Fi connection problems and bring back your precious Internet connectivity.
9. Check if you have Internet Connectivity and Restart Router
While you are baffled by Wi-Fi not working on your iPhone or iPad, the problem might not be related to your iOS device at all. It is advisable to check if you have Internet connectivity available on your Wi-Fi network in the first place. You can do so by checking the Internet light on your router or accessing the same network with some other device such as another iPhone or your computer. If your Internet is not working on other devices as well, then you need to contact your service provider to have your Internet connection restored.
10. Remove Wi-Fi Network and add again
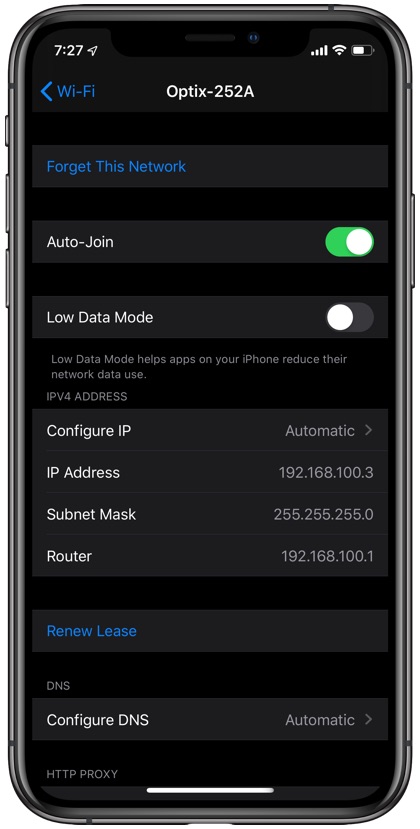
Sometimes Wi-Fi network stops working on iPhone or iPad due to configuration issues. You can solve them by simply removing the Wi-Fi network from your device, and then adding it back again using a few simple steps. To remove a Wi-Fi network from your iOS device simply go to Settings and then to Wi-Fi. From there look for your Wi-Fi network and tap on the ‘i’ button located next to its name. Finally tap on Forget This Network option in order to remove the network from your device.
Once you have removed the Wi-Fi network, you can connect to it again from the Wi-Fi settings page. You will need to enter the Wi-Fi password again in order to connect to this network.
11. Reset your Network Settings
We have also recommended resetting your iPhone’s network settings in first part of this guide, and will recommend it again for troubleshooting Wi-Fi issues with an iPhone or iPad, as doing so can effectively solve Wi-Fi network issues for iPhone users. You can reset your iPhone’s network settings by going to Settings > General > Reset, and from there tap on the ‘Reset Network Settings’ option. Your iPhone will ask you to confirm this action by entering your device’s passcode. Enter the passcode in order to reset the iPhone’s network settings. Afterwards connect to your Wi-Fi network to see if it has started working again or not.
12. Enable Auto-Join for your Wi-Fi network
Wi-Fi connectivity issues are certainly not limited to Wi-Fi not working as users also face problems when their device constantly disconnects from their Wi-Fi network, forcing them to reconnect to it again and again. This problem can be solved by enabling the Auto-Join feature that is offered on the Wi-Fi settings page. When this feature is enabled your iPhone will automatically connect to the said Wi-Fi network without requiring any effort from your end. You can enable Auto-Join feature by going to Settings > Wi-Fi and tapping on the ‘i’ button for your Wi-Fi network. Then from your Wi-Fi’s settings page turn on the toggle for Auto-Join.
There you go folks, this was our 12 step ultimate guide for solving Cellular network and Wi-Fi issues with your iPhone, iPad and iPod touch. If you have any questions, then feel free to use the comments section below.

