


There’s a lot to be excited about the Bluetooth capabilities of your iPhone, iPad and Mac. Thanks to the amazing AirDrop feature these devices are able to seamlessly share content with each other making user’s life easier. In this tutorial we will show you how to AirDrop from iPhone to Mac. The steps for performing AirDrop from iPad to Mac are also the same.
AirDrop helps you share pictures, videos, documents and other important content from one Apple device to another nearby Apple device. Without it sharing content between iPhone and Mac wouldn’t be as easy.
Check These Things Before Using AirDrop
Before practicing how to airdrop from iPhone to Mac, ensure you check the following:
- The person you are sending content is nearby- within Bluetooth and Wi-Fi range.
- You and the receiver have turned on both Wi-Fi and Bluetooth.
- Both the send and receive should turn Hotspot off
- The receiver’s AirDrop setting allows receiving from Contacts only. If you are in their contact list, you need to provide them with your email address or mobile number in your contact card to make exchange successful
- And in case you are not on their list, their settings should allow Everyone to receive the content.
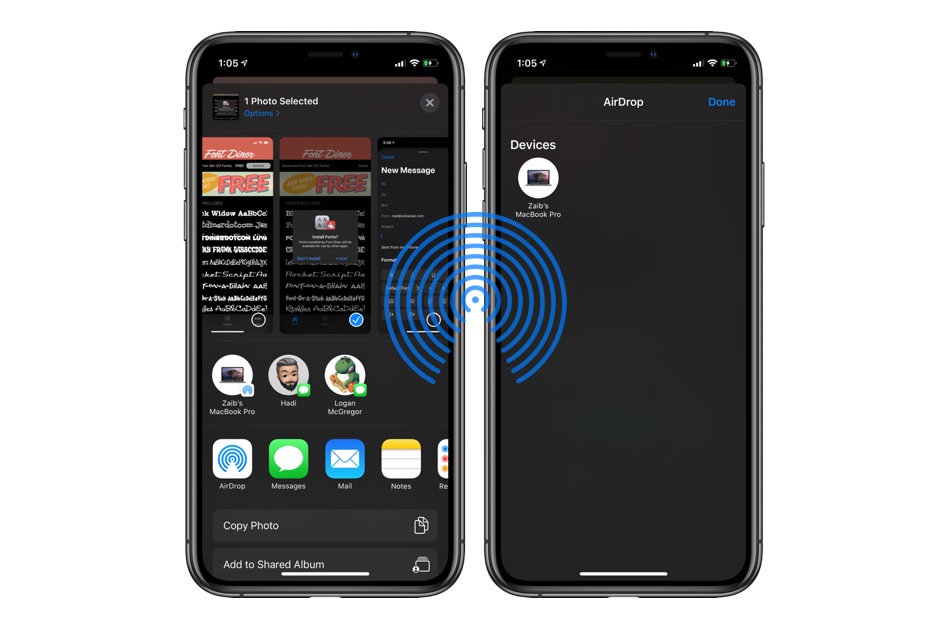
Transfer Files From iPhone To Mac With AirDrop
Follow these steps to share content with AirDrop:
- Open the content that you want to share such as photos.
- Tap on the Select button and swipe left or right to select multiple pictures.
- Tap Share or this
 icon from the bottom bar.
 - Now tap on the AirDrop receiver that you want to share the content with.
You can follow this procedure to share any type of content between your own devices or devices owned by your friends.
Receive Content On iPhone With AirDrop
When another user wants to send you content with AirDrop, an alert will appear along with a preview of the content you will receive. Here you can choose to Accept or Decline.
In case you accept, you will receive the content in the same app it was sent from. For instance, websites open in Safari or pictures are received in the Photos app on your iPhone.
However, if you are sending content to yourself such as when you AirDrop from iPhone to Mac, you will not have to Accept or Decline. You will automatically receive the content on your device. Make sure both of your devices are signed in with the Same ID.
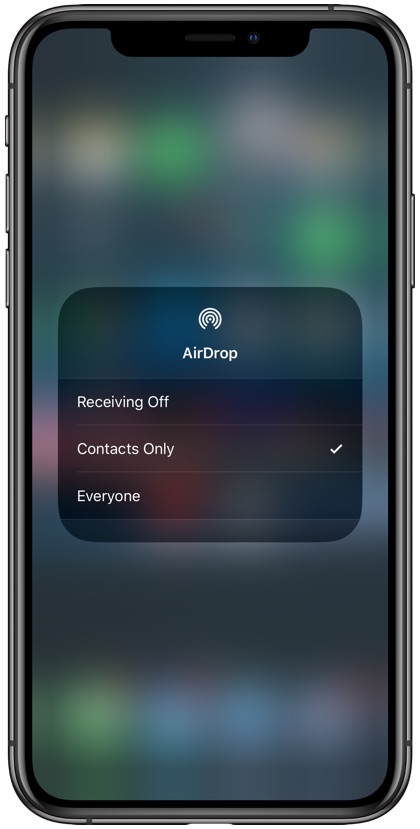
Change Who Can AirDrop With You
You can choose who can AirDrop with your iPhone or iPad by following a few simple steps. Here is how to do it:
Launch Settings -> General -> AirDrop and choose who can send you content through AirDrop.

You can also change these settings through Control Center by performing the steps below.
Follow these steps to set your AirDrop options in Control Center:
- iPhone X or later: Swipe down the screen from the upper right corner and open Control Center.
-
- iPhone 8 or later: Swipe up from the bottom of the screen.
- In the upper left corner, press and hold the network settings widget.
- Now, tap AirDrop icon and select one of the following options:
-
- Receiving Off: You will not receive any request to accept the content
- Contacts Only: Only your contacts will see your device to send the content
- Everyone: All nearby Apple devices with AirDrop can see your device.
Do you also share content using AirDrop? Which options have you set your device on? If you have faced any issue sharing content with AirDrop from iPhone to Mac, share with us in the comments below.

