


In this article, we’ll walk you through a comprehensive, step-by-step guide on how to enable Stolen Device Protection feature and also how to disable it when needed.
Think about it, your iPhone holds everything from your top-secret bank details and passwords to those embarrassing night-out selfies, and treasured family photos. We’re talking about the sacred ground of your Messages app, holding the highs and lows of your daily banter. And let’s not even open the Pandora’s box of your Notes app – touch it, and you might as well be playing with fire.
Now, imagine a scenario where this personal vault falls into the wrong hands. Terrifying, right? That’s where iPhone Stolen Device Protection feature comes into play, adding a layer of defense that ensures that even if your iPhone goes AWOL, your personal space remains just that – personal.
Can I Enable Stolen Device Protection?
Before you get too excited, there are a couple of prerequisites to keep in mind. Firstly, this nifty feature is exclusive to iPhones that can handle the iOS 17 update. So, if you’re still rocking an iPhone XS or a newer model, you’re in luck. To make sure you’re not missing out on the security party, update your iPhone to iOS 17.3 or later.
Enable Stolen Device Protection Feature?
Securing your device against potential theft is a smart move, and luckily, there’s no rocket science involved to enable Stolen Device Protection feature. Here’s how you can activate iOS 17 Stolen Device Protection:
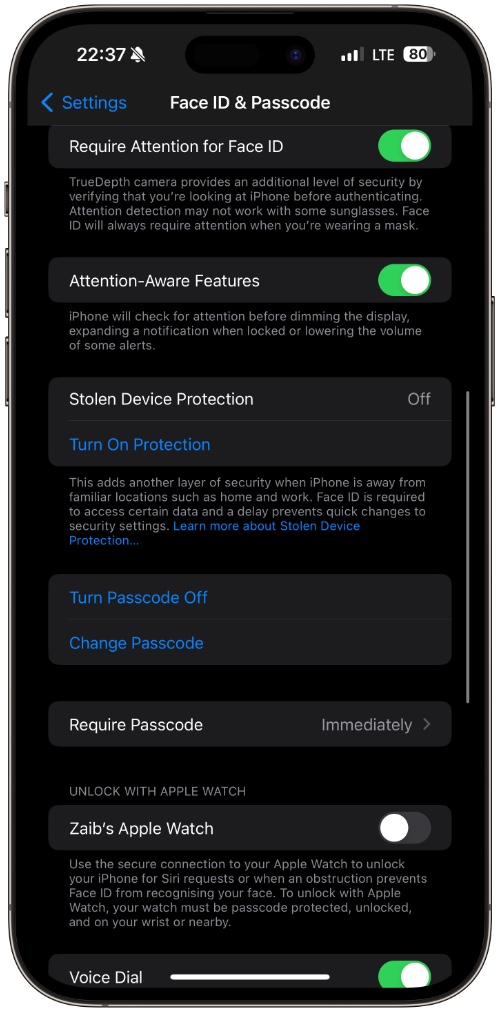
- Unlock your iPhone and open the Settings app.
- Now, scroll down the menu until you find the option labeled Face ID & Passcode (or Touch ID and Passcode, depending on whether you own the latest iPhone or an older model).
- Enter your passcode when prompted.
- Scroll down to find the Stolen Device Protection option
- Turn on the toggle found next to Stolen Device Protection.
Disable Stolen Device Protection Feature?
Should the need arise, turning off Stolen Device Protection is a straightforward process. Trace your steps back to how you enabled it in the first place and simply tap “Turn Off Protection.”
- Open Settings and go to Face ID & Passcode.
- Tap on the Stolen Device Protection option.
- Turn off the toggle for Stolen Device Protection.
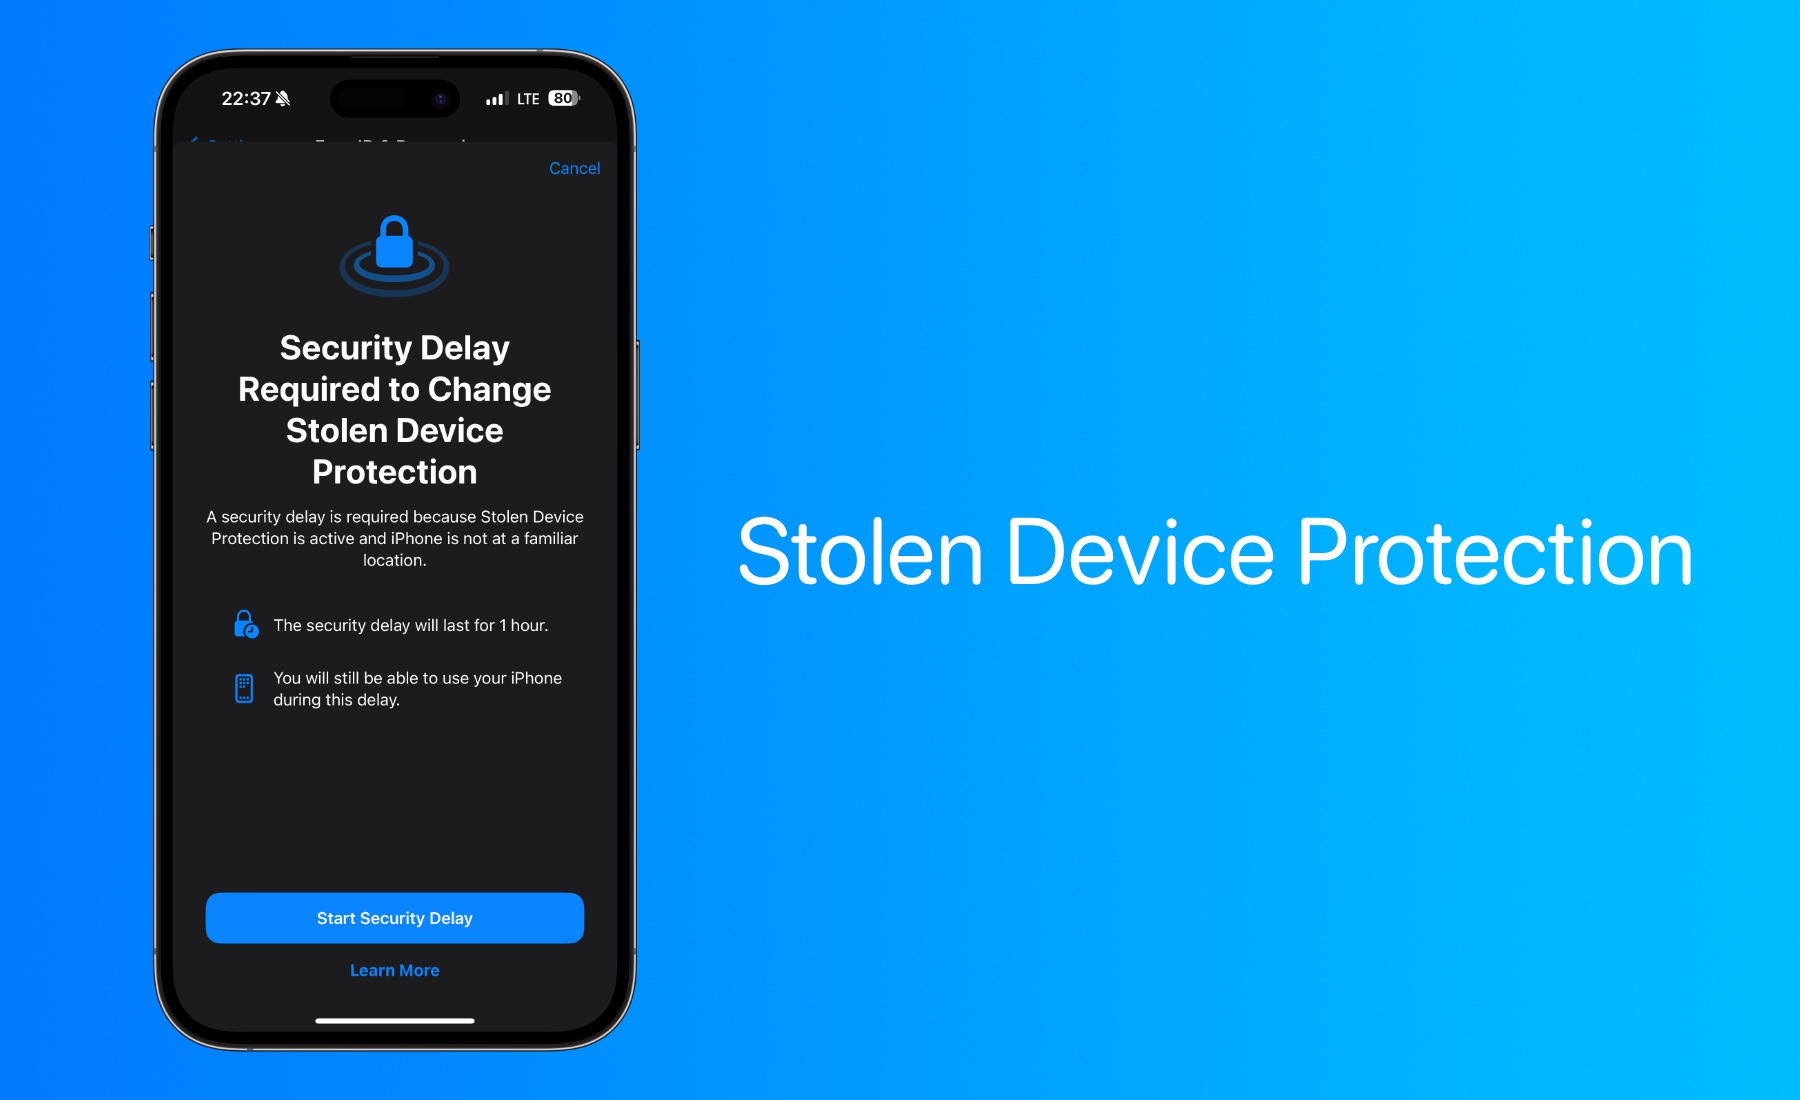
When you tap to turn off the toggle in step 3, iPhone will start a 1-hour security delay, after which the feature will get disabled.
Remember, if you restart or turn off your iPhone during this 1-hour security delay the timer will reset and start once again.
Understanding Stolen Device Protection
Thanks to the introduction of Stolen Device Protection, your iPhone’s security just got a serious upgrade. Now, you might be wondering, “What is Stolen Device Protection?” and why the sudden focus on it?
Let’s hit the rewind button and travel back to 2023, a year that made waves with a surge in iPhone thefts. The headlines screamed about thieves on the prowl, aiming to grab hold of users’ personal information. Once armed with this information, they had a ticket to empty bank accounts, snatch passwords, and render the stolen iPhones untraceable.
In response to this sneaky business, Apple beefed up iPhone security with the introduction of Stolen Device Protection in iOS 17.3. Thus making it a lot harder for thieves to get into a stolen iPhone with passcode-protected data. When you enable Stolen Device Protection, Face ID or Touch ID becomes a mandatory step to access crucial areas. Moreover, it comes with an additional layer of security, making it even stronger.
iPhone Stolen Device Protection: Features, Activation, & Deactivation
Let’s delve into the core features that make this a game-changer for iPhone security.
Biometric Barriers: A Crucial Gateway
In the tech world today, everyone’s talking about biometric authentication, like Face ID and Touch ID. But it’s not just about unlocking your device anymore. Now, these fancy technologies are the key to protecting a bunch of important stuff on your device.
Take, for instance, iCloud Keychain, where your passwords and passkeys reside. When you turn on the Stolen Device Protection feature, accessing this digital vault becomes a secure affair. More precisely, it ensures that only the rightful owner, verified by Face ID or Touch ID, can unlock the gateway to their credentials. More so, it’s not just limited to passwords as Lost Mode settings, device erasure options, and even making purchases in Safari all require the biometric stamp of approval.
Let’s break it down – when Face ID or Touch ID joins forces with Stolen Device Protection, it ensures a strong defense mechanism. So, if your iPhone gets stolen, the biometric safeguards kick into action, and make sure only the real owner can do certain things, including:
- Check and use your saved passwords in iCloud Keychain.
- Apply for a new Apple Card.
- View an Apple Card virtual card
- Turn off Lost Mode on your device
- Wipe out all content and settings on your device
- Perform specific actions related to Apple Cash and Savings in your Wallet
- Use payment methods saved in Safari
- Set up a new device using your iPhone
What’s important to know is that there’s no backup passcode for these actions. Face ID or Touch ID, they’re the only ways to protect your device as there’s no other passcode option as a backup plan. So, once you enable Stolen Device Protection, biometric authentication goes beyond unlocking your device. Now, it’s about securing every facet of your digital life.
Introducing a Time-Tested Security Delay
Introducing a one-hour security delay on specific actions is an integral part of the iPhone Stolen Device Protection feature. When you decide to make security changes, there’s a deliberate one-hour security delay. So, if someone tries to mess with your Apple ID login, Face ID steps in and becomes the gatekeeper. But before any password modifications can happen, an hour needs to tick away on the clock. The waiting game ensures that any changes made are intentional and well-thought-out, giving you an added buffer against potential security threats.
Now, hold that thought as there’s a loophole – a trusty exemption to the rule. If you’re making these security moves from a trusted location, you get a free pass. Think of your home or your workplace. So, fret not, your iPhone won’t throw an hour-long curveball at you when you’re making changes.
After you enable Stolen Device Protection, here’s a list of actions subjected to biometric authentication and one-hour security delay combo:
- Update your Apple ID password
- Adjust specific Apple ID security settings
- Changing iPhone passcode
- Manage Face ID or Touch ID
- Turn off the Find My feature
- Turn off Stolen Device Protection


“Should the need arise, turning off Stolen Device Protection is a straightforward process. Trace your steps back to how you enabled it in the first place and simply tap “Turn Off Protection.”
Wish that were true. Not only do you have to wait an hour, when you come back and try turning SDP OFF, it forces you to wait another hour. And so on!
Someone reports that you have to be right there after one hour and turn it off immediately or the counter resets!
Ridiculous. Touch ID should be all that’s needed to turn it off.
Even better, Apple should simply make it impossible to see passwords or use them without biometric authentication. Right now, if someone steals your passcode, they have the keys to the kingdom. Hence, SDP — but it’s convoluted, the iPhone either doesn’t ID favorite locations or IDs far too many, people have been locked out permanently. It also seems that you have to have turned on Significant Locations — and been using the phone for a long, long time with WIFI on, so it even learns your locations.
Why bother with all this rigamarole? Given people an option to block passcodes from changing Apple IDs and from seeing passwords.
Voila! Simple solution.