We have all been in situations in which we have accidentally deleted photo from iPhone or iPad only to realize that we really didn’t want to. For me a thing like this happens when I am on one my mass photos deletion campaign and end up deleting that memorable photo that I would love to keep in my collection. What many people don’t know or tend to often forget is that iOS gives a 30 day grace period in which you can actually recover any photo you might have accidentally deleted.
Recovering Accidentally Deleted Photo From iPhone or iPad
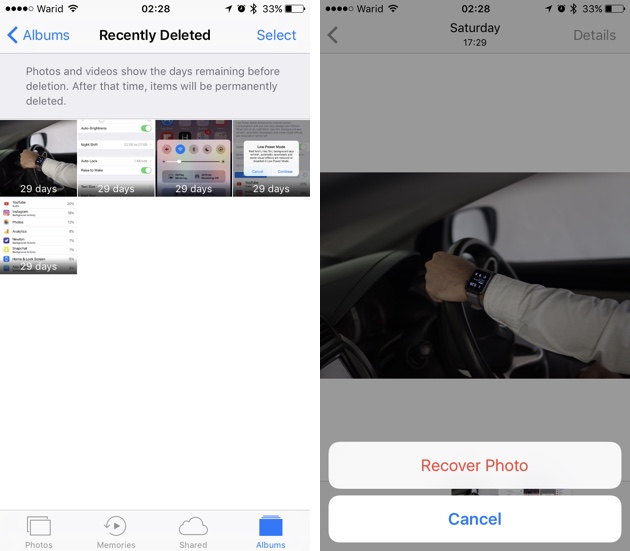
The ‘Recently Deleted’ album gives users access to accidentally deleted photo from iPhone. Follow the simple steps below to access and recover accidentally deleted photos.
- Open the Photos app and tap on the ‘Albums‘ tab.
- Once on the Albums page tap on ‘Recently Deleted‘ album.
- There you can find the photos you deleted in the past 30 days. Open the photo you want to and tap on ‘Recover‘ button.
- If you are want to recover more than one photo, then tap on ‘Select‘ and then tap on all of these photos to select them. Finally hit the ‘Recover‘ button to mass delete them all at once.
That’s it, now you know what to do if you accidentally deleted photo from iPhone, iPad or iPod touch.
Knowing about this feature is actually quite useful in case you want to get rid of a photo permanently. Since iOS keeps every photo you delete in the ‘Recently Deleted‘ album for 30 days, if you want to instantly delete a photo for good, it is a good idea to open this album and then manually delete the photo without having to wait for 30 days. It is like emptying the Recycle Bin on the computer.
Did you know about this simple iOS trick? Do let us know in the comments section below. [h/t iDB]


If you did not backup your iphone with iTunes or iCloud , the recovery software for iPhone users may help you retrieve the deleted data, you can get them back in few steps. Have a try of MobiKin iOS Recovery, it would help you recover lost data.
https://uploads.disquscdn.com/images/53c02bac7003036624dfa22e3fb668bd1d9c4688e0a58f807366cc5aa6ec22e6.jpg
Without backup file that you can recover from, I think it is a good method to try recovery tool.
You can have a try of MobiKin iOS Recovery, usually, they can help you get back lost or deleted data from your phone’s memory, but remember , don’t add more data to your phone after data loss.
https://uploads.disquscdn.com/images/973b4c5ed00b3568c88000fbf18cd0aa8abc203ddcf1b305c04f1562af52d252.jpg