


You may have not noticed yet but iOS 11 significantly changes the way your iPhone and iPad take photos and record videos. The major difference lies in the format the images and videos are captured and saved in. iOS 11 introduces new formats, HEIF for images and HEVC for videos. These formats are supposed to reduce the file size of the images while maintaining their quality, making them more efficient.
If you would rather prefer the traditional JPEG format for photos and H.264 for videos to ensure better compatibility with other devices, then you have the option to switch back to the old options. In this step by step guide we will show you how you can switch back to JPEG and H.264 video formats on your iOS 11 powered iPhone, iPad or iPod touch. You can also learn how to make sure your iPhone changes the format of the photos from HIEF to JPEG even if you decide to keep the high efficiency setting.
Make iPhone shoot in JPEG and H.264 formats
- On your iPhone or iPad device open Settings.
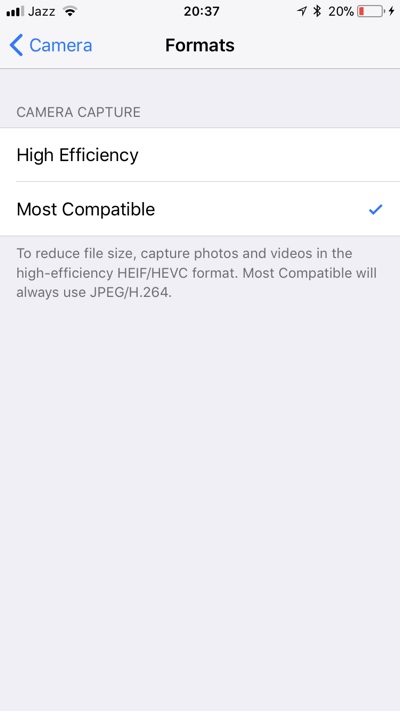
- Go to Camera option and then tap on ‘Formats‘.
- Once you are on the Formats screen choose ‘Most Compatible‘ option.
When Most Compatible is selected, any photos and videos you take with your iOS device will now be stored in JPEG and H.264 formats. If you want to return to the High Efficiency mode and have HEIF and HEVC formats selected, then you can return to the Formats screen and choose the other option.
Converting files back to JPEG/H.264 only when transferring to Computer
You have the option to make iPhone convert photos to JPEG and H.264 formats only when you transfer them to your Mac or PC. This way these images will be stored in high efficiency HEIF and HEVC formats. Choosing high efficiency mode with this setting will allow you to transfer files in more compatible formats while keeping the newer formats that ensure images take up less space on iPhone.
Follow the steps below to make iPhone automatically convert files to JPEG and H.264 when transferring to Mac or PC.
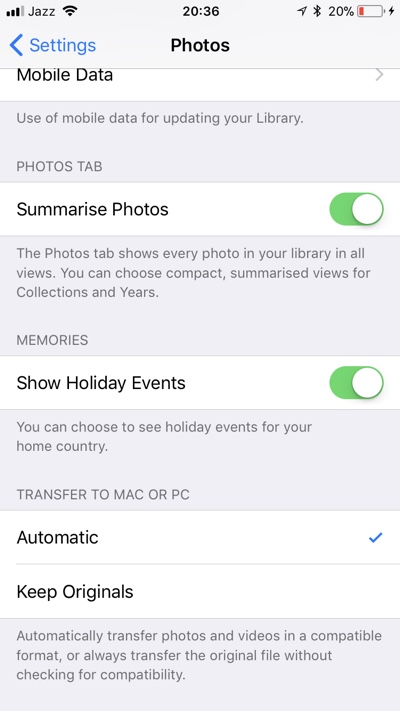
- Open Settings app on your iPhone or iPad.
- Tap on Photos option and scroll down to the bottom of the page.
- There you will find the Transfer to Mac or PC heading, under it choose Automatic.
If Keep original is selected, then iOS will transfer in original HEIF and HEVC formats, which could cause compatibility issues. So it is recommended to choose Automatic.

